
Can You Fix Automotive Clear Coat Peeling

A lifted edge the size of a fingernail on a hood can look harmless. Then a wash mitt catches it, airflow gets underneath it, and the damaged patch grows month after month. Clear coat peeling is rarely something you can polish away. It is usually a coating adhesion failure, which means the clear layer has separated from the color coat below it.
Modern automotive paint is built in layers. There is primer, a colored base coat, and a transparent clear coat on top. The clear coat gives the finish its gloss and depth, but it also provides much of the UV protection that keeps the color from fading. Once that top layer loses its bond, the exposed base coat starts aging fast.
The short answer is yes, you can fix automotive clear coat peeling. The honest answer is that a lasting repair usually means sanding away the failed clear, refinishing the damaged area, and often repainting the full panel for the best blend.

What peeling clear coat looks like
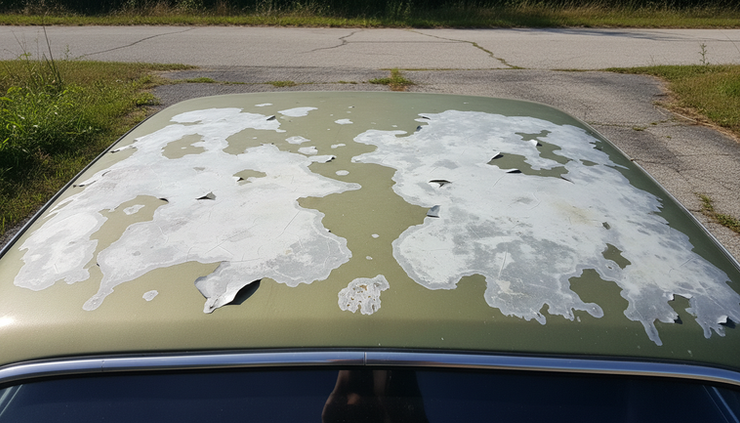
Clear coat failure often starts on horizontal panels because they take the hardest hit from sun, heat, rain, snow, dust, and washing. Hoods, roofs, trunk lids, and the upper edges of doors are common trouble spots.
Early signs include:
Dull patches that do not shine after polishing
Fine cracks or checking in the clear
A cloudy white or gray haze
Rough areas that feel dry or scaly
Edges where the clear looks lifted from the color
As the problem grows, the clear coat may come off in uneven flakes. The exposed base coat may still match the body color at first, but it no longer has real protection. It can fade, stain, absorb moisture, and become harder to match later.
Do not confuse peeling clear with deeper paint damage. If you see primer, bare metal, rust, or body filler, the repair has moved beyond a clear coat issue. At that point, the panel needs paint repair work from the lower layers up.
Why clear coat starts peeling
Clear coat fails when it loses adhesion or breaks down from exposure. Sometimes the problem comes from age. Sometimes it comes from a poor previous repair. Often it is a mix of both.
The most common causes include:
UV damage
Sun exposure slowly breaks down clear coat resin. Once the clear becomes thin, brittle, or chalky, it can no longer hold together.
Heat cycling
A hood or roof can get hot in direct sun, then cool quickly at night or in rain. That repeated expansion and contraction stresses the finish.
Thin or uneven clear coat
If the clear was sprayed too thin at the factory or during a repair, it has less material to protect itself. Edges and body lines are especially vulnerable.
Poor preparation before repainting
Clear coat needs a clean, properly sanded base to grip. If the surface had wax, silicone, oil, dust, or the wrong sanding scratch, adhesion can fail.
Old collision or spot repairs
A panel that was repaired years ago may peel before the rest of the car. That does not always mean the current owner did anything wrong. It may simply reveal a weak repaint.
Harsh cleaning or neglect
Strong chemicals, automatic brushes, abrasive compounds, and skipped waxing can speed up damage once the clear is already weak.
What you can and cannot fix with polishing
Polishing removes a very thin layer of clear coat to smooth scratches and restore gloss. It works when the clear coat is still present and healthy enough to refine.
It does not reattach clear coat that has lifted from the base coat.
If the finish is only oxidized or lightly scratched, compound and polish may bring back shine. If the surface feels rough, flaky, or has visible edges where the clear has separated, polishing can make the peeling worse. A buffer may catch the lifted edge and tear away more material.
A simple test helps:
Surface condition | Likely problem | Best next step |
Dull but smooth | Oxidation or light surface wear | Try a mild polish |
Cloudy with fine cracks | Aging clear coat | Inspect before polishing |
Flaky with raised edges | Clear coat delamination | Refinish the damaged area |
Color missing or primer visible | Base coat or primer damage | Repair and repaint from lower layers |
Rust or bare metal visible | Corrosion has started | Remove rust, prime, and repaint |
If the clear is peeling, waxes, glazes, and ceramic sprays may improve the look for a short time, but they will not stop the failure. They sit on top of the damage. They do not rebuild the film.
When a small spot repair makes sense
A small repair can make sense when the peeling is limited, the surrounding clear is stable, and the goal is to slow the damage or improve appearance without a full repaint. This is most realistic on an older daily driver where perfect color and gloss are not expected.
A typical small repair involves sanding away loose clear, feathering the edge, cleaning the surface, spraying base coat where needed, and applying new clear coat. The hard part is not spraying the clear. The hard part is blending the edge so the repair does not leave a visible halo.
A small touch-up is less likely to last if:
The clear is still lifting around the repair
The base coat has faded badly
The damage sits in the middle of a large flat panel
The panel has already been repainted poorly
The vehicle has multiple peeling areas
The edges tell the truth. If more clear flakes off while sanding or washing, the failure is wider than the visible spot.
Why full-panel refinishing is often the durable repair
For a repair that looks right and lasts, body shops often refinish the entire panel. That means they remove failed clear, prepare the surface, restore the base coat as needed, and spray fresh clear across the full panel.
This approach reduces the risk of a visible edge. It also gives the new clear a consistent surface to bond to. On a hood, roof, or trunk lid, this usually produces a cleaner result than trying to bury a small patch in the middle of the panel.
A full-panel repair may still need blending into adjacent panels if the color is hard to match. Metallic, pearl, tri-coat, and faded colors can be tricky. The base coat may look close in the can, then appear different in sunlight once sprayed beside aged paint.
That is why professional paint repair is part chemistry, part surface preparation, and part visual matching.

How a proper clear coat repair is usually done
The exact process depends on the paint system, panel condition, and product instructions. Still, most lasting repairs follow the same basic path.
Clean the panel thoroughly
The surface needs to be free of wax, grease, silicone, road film, and dirt. Skipping this step can trap contamination under the repair and cause more peeling later.
Remove loose clear coat
Any clear that has lost adhesion must be removed. New clear coat cannot create a lasting bond over material that is already letting go.
Feather the damaged edge
The edge between old coating and exposed base must be sanded smooth. A sharp ledge will usually show through the new finish.
Inspect the base coat
If the base coat is stained, faded, sanded through, or damaged, it needs color repair before clear coat. Spraying clear over a weak base coat may lock in a bad appearance.
Apply compatible base coat if needed
Color must match the vehicle as closely as possible. Compatibility matters, so the primer, base coat, and clear coat should be part of a system that works together.
Spray new clear coat
Clear coat needs the right film thickness, flash time, temperature range, and technique. Too dry, too thin, or too heavy can cause texture, solvent problems, or weak durability.
Sand and polish after curing
Once cured, the finish can be wet sanded and polished if needed. This step can flatten orange peel and improve gloss, but it should not be rushed.
For do-it-yourself refinishing, product choice matters. If you plan to tackle paint repair at home, use compatible materials and follow the technical directions closely. You can browse automotive paint and refinishing supplies from Eastwood Canada when planning the job.
DIY repair or professional repaint
Small clear coat repairs are possible at home, but expectations matter. Aerosol clear can improve a damaged spot, especially on an older vehicle, but it may not match the gloss, depth, and durability of a sprayed two-component automotive clear used with proper safety equipment.
A professional repair is usually the better choice when the vehicle is newer, the panel is large, or the damage is in a highly visible area. It is also safer if the repair requires two-component products, because many professional-grade coatings need proper respiratory protection and controlled application conditions.
DIY may be reasonable when:
The vehicle is older
The damaged area is small
The goal is improvement, not perfection
The panel has no rust or bare metal
You can work safely in a clean, ventilated area
Professional repair is better when:
The peeling covers a large part of the panel
Multiple panels are failing
The color is metallic, pearl, or hard to match
The base coat is damaged
The car has resale or collector value
You want the repair to last and blend well
A poor repaint can fail faster than the original clear. Good prep is what separates a lasting repair from a temporary cosmetic cover-up.

How to stop clear coat peeling from spreading
Once clear has started peeling, you cannot truly stop the failure without removing the loose material and refinishing it. Still, careful handling can slow the spread until you repair it.
Wash gently by hand. Avoid pressure washers near the damaged edge. Do not aim compressed air at peeling clear. Keep aggressive compounds and rotary polishers away from the lifted area. If a flake is loose, do not pull it like tape. It may tear off a larger sheet.
Parking in shade or under cover helps reduce UV and heat stress. Wax or sealant can protect intact clear coat nearby, but do not expect it to bond peeling clear back down.
The best prevention starts before peeling appears:
Wash regularly with car-safe soap
Remove bird droppings and tree sap quickly
Use wax, sealant, or ceramic protection on healthy paint
Avoid harsh detergents and abrasive cleaners
Park under cover when practical
Repair chips and scratches before moisture gets under the coating
Healthy clear coat can last a long time with basic care. Failed clear coat needs repair, not just shine.
The real answer
You can fix peeling clear coat, but the right fix depends on how far the failure has spread. If the clear is only dull, polishing may help. If it is lifting, flaking, or cloudy with rough edges, the failed coating has to come off. A small spot repair can work in limited cases, but full-panel refinishing is often the cleaner and more durable solution.
The key is to identify the layer that failed before buying products or starting to sand. Clear coat peeling is a surface failure only when the base coat is still sound. Once primer, metal, or rust enters the picture, the repair needs to go deeper.
Treat the first lifted edge as a warning. The sooner the damaged clear is handled properly, the better the chance of saving the panel from a larger, more expensive repaint.


Comments