
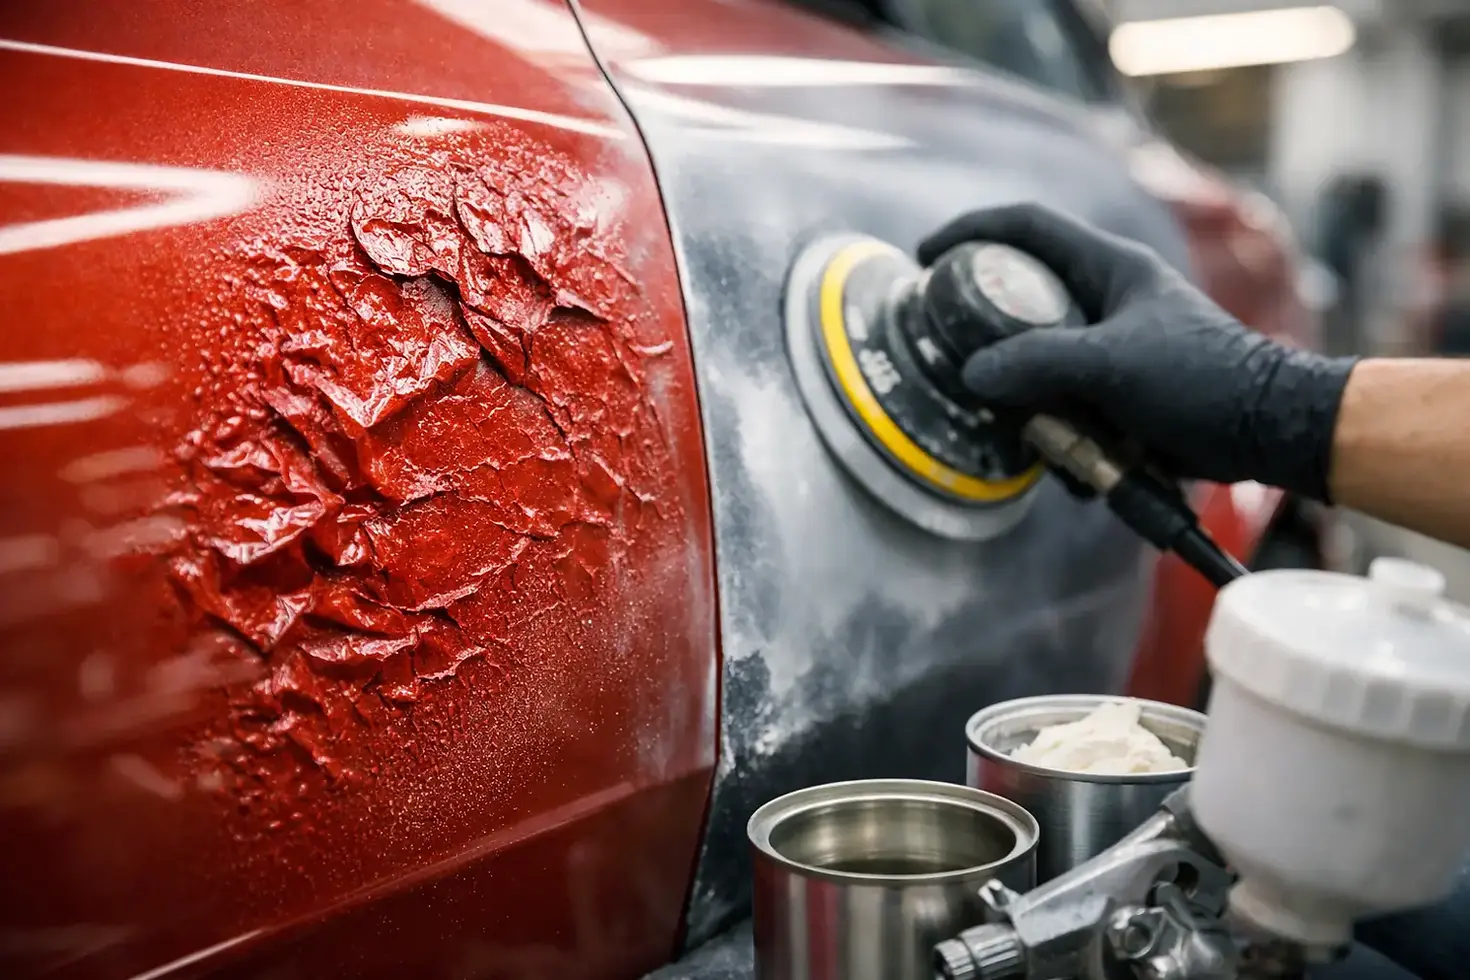
Why Does Automotive Paint Wrinkle? Causes and Fixes

A fresh coat that suddenly puckers, shrivels, or lifts can turn a promising paint job into a stop-work moment. If you are asking, why does automotive paint wrinkle, the short answer is that the new coating has disturbed the layer beneath it or dried unevenly because solvents cannot escape correctly. The longer answer matters, because the right repair depends on exactly when the defect appeared and what is under the paint.
Wrinkling is not the same as dry spray, orange peel, or fisheyes. It looks like the finish has folded in on itself, sometimes in small patches and sometimes across an entire panel. Do not try to bury it under more paint. Once the surface has moved, adding material usually makes the repair larger.
Why Does Automotive Paint Wrinkle?
Automotive paint wrinkles when one coat softens, swells, or loses adhesion before the paint system has had time to stabilize. The usual culprit is solvent interaction. A hot, wet new coat can penetrate an older finish, primer, sealer, or partially cured basecoat. As the affected layer softens, the surface film tightens and bunches into wrinkles.
This can happen with professional-grade materials as well as aerosol products. The difference is usually preparation, product compatibility, film thickness, spray technique, temperature, and patience between coats. A panel may look dry to the touch but still be vulnerable underneath.
The appearance offers a clue. Wrinkles that show up immediately after spraying often point to solvent attack or an overly wet coat. A defect that appears later, especially in a thick primer or filler area, may indicate trapped solvent, excessive film build, or poor curing conditions.
The Most Common Causes of Paint Wrinkling
Recoating Before the Previous Layer Has Cured
https://www.eastwoodcanada.com/paint?currency=CAD
Flash time and cure time are not interchangeable. Flash time is the period needed for solvents to begin leaving the surface before the next coat goes on. Cure time is the much longer period required for the coating to harden through its full thickness.
A common mistake is spraying a strong solvent-based topcoat over an old finish that feels dry but has not fully cured. The new material re-wets the old layer, which expands and wrinkles. This is especially likely when painting over unknown previous repairs, old lacquer, low-quality aerosol paint, or a finish applied outside its stated recoat window.
Read the technical instructions for every product in the system. If you miss the recommended recoat window, the safe route may be allowing a full cure, then scuffing the surface before continuing. That extra day can save several days of stripping and repainting.
Applying Coats Too Heavy or Too Fast
Wet coats build gloss, but there is a limit. A coat applied too heavily skins over at the surface while solvent remains below. When the trapped solvent tries to escape, it can distort the coating and leave wrinkling, lifting, or a soft finish.
This is common on vertical panels, edges, and repair areas where the gun slows down. It also happens when a painter attempts to achieve hiding in one pass instead of using the recommended number of medium coats. Metallic basecoat, primer, single-stage paint, and clearcoat all have different application needs. Treating them the same is a reliable way to create defects.
Maintain consistent gun distance, overlap, air pressure, and travel speed. If the product calls for two or three medium-wet coats, follow that schedule. More material is not automatically better coverage.
Using Incompatible Products
Not every primer, sealer, color coat, and clearcoat is designed to work together. Mixing products across different chemistries can produce unpredictable reactions, particularly over existing finishes. Even products that appear compatible may require a barrier coat or a specific cure schedule.
Unknown substrates deserve extra caution. A used hood, door, or fender may have factory paint, body-shop refinish material, lacquer, enamel, spot putty, aerosol primer, and filler all on the same panel. A solvent-sensitive layer buried below the surface can still react when a new coating is applied.
When you cannot identify the old paint, test a small, inconspicuous area first. Better yet, strip questionable repair zones to a stable substrate, complete the metal and filler work correctly, then rebuild with a compatible primer and paint system. It takes longer upfront, but it removes the guesswork.
Poor Surface Preparation
https://www.eastwoodcanada.com/primer?currency=CAD
Wax, grease, silicone, sanding residue, and moisture usually cause other paint problems first, but poor preparation can contribute to lifting and wrinkling when adhesion is already marginal. Paint cannot hold a smooth film on a contaminated or poorly sanded surface.
Clean the panel with the appropriate wax and grease remover before sanding and again before paint. Use clean lint-free wipes, changing them often rather than spreading contamination around. Then sand to the grit range specified for the coating being applied. A glossy unsanded surface may let paint appear to stick initially, then release when exposed to fresh solvents.
Avoid touching a cleaned panel with bare hands. Skin oils can show up in the finish, especially around edges and handles where people naturally grab the part.
Temperature, Humidity, and Airflow Problems
Paint products are engineered around a temperature range. In a cold Canadian garage, solvent evaporation slows and coatings remain soft longer than expected. In excessive heat, the outer surface can dry too quickly while lower layers remain wet. Both conditions increase the risk of solvent-related defects.
Humidity and poor airflow make the situation worse. Moisture can affect certain materials, while stale air prevents solvents from clearing the work area efficiently. The goal is not maximum heat. It is a clean, stable spray environment with the temperature, reducer, activator, and flash times matched to the conditions.
If the shop temperature is low, warm the panel and materials according to product guidance before spraying. Do not use an open flame or uncontrolled direct heat near paint products. After painting, allow the coating to cure in controlled conditions instead of moving a cold panel straight outdoors.
How to Repair Wrinkled Automotive Paint
The right repair begins with restraint. Stop spraying as soon as you see a reaction. Let the panel sit long enough for the affected material to harden. Sanding soft paint too soon smears the defect, clogs abrasives, and hides how deep the failure actually goes.
Once cured, inspect the damage. If the wrinkling is limited to the clearcoat or a shallow color layer, you may be able to sand the area level and refinish it. If the coating has lifted from the primer, exposed a different color underneath, or remains soft after adequate curing, sand back until you reach a firm, stable layer. In severe cases, that means removing the failed finish to bare metal or sound factory coating and starting again. https://www.eastwoodcanada.com/product-page/eastwood-canada-usc-high-build-primer-surfacer-gallon-50776zp?currency=CAD
Use a guide coat when blocking primer repairs. It quickly shows whether the wrinkle has been fully leveled and helps prevent low spots from being hidden under more material. Feather the surrounding edges gradually. A hard paint edge can print through a fresh finish later, even if it looks acceptable immediately after spraying.
After sanding, clean the panel thoroughly and choose the correct next layer. Bare metal may need the appropriate corrosion-resistant primer. Sand-throughs, filler repairs, and uneven surfaces may need a build primer. A properly selected sealer can create a uniform, isolated surface before color, but it is not a shortcut for covering unstable paint underneath.
Prevent Wrinkling on the Next Panel
The best prevention is treating refinishing as a system rather than a stack of separate cans. Use compatible products where possible, follow the specified reducer or activator choices, and respect both flash and cure times. Keep a simple job note with the products used, mix ratios, number of coats, and application times. If something reacts, those notes make diagnosis much easier.
Before committing to a full vehicle panel, spray a test card or a hidden area using the exact substrate, primer, color, and clear combination you plan to use. This is particularly worthwhile on restorations with unknown paint history. A small test can reveal lifting before it ruins a quarter panel.
Gun setup also matters. Verify your tip size, air pressure https://www.eastwoodcanada.com/product-page/eastwood-elite-qst-30-60-scroll-air-compressor-with-automatic-drain-system?currency=CAD at the gun, fan pattern, and fluid control before the first pass. An uneven pattern or excessive fluid delivery encourages heavy spots that trap solvent. For aerosol work, keep the can moving, maintain a consistent distance, and use several controlled coats rather than one heavy attempt at coverage.
Eastwood Canada serves builders who need restoration-grade materials for jobs where rework is expensive. Start with a stable substrate, give each layer the time it needs, and test uncertain surfaces first. That approach may not be flashy, but it is how paint stays flat, glossy, and where it belongs.


Comments